Selasa, 23 Februari 2010

Di bawah ini adalah sepuluh tips yang dapat Anda gunakan untuk menghemat pemakaian energi pada pc dan laptop.

1. Atur pencahayaan dan kontras monitor
Mungkin bagi orang yang awam atau pemula dalam menggunakan komputer, mereka jarang sekali memperhatikan pengaturan monitor mereka. Yang dimaksud dalam hal ini adalah tingkat pencahayaan dan kontras yang diatur terlalu tinggi akan bisa menghabiskan banyak energi. Maka untuk itu anda harus bisa mengatur pencahayaan dan kontras tersebut, untuk mengatur pencahayaan dan kontras monitor tersebut gunakan tombol yang berada di bawah monitor.

2. Matikan monitor
Tips yang ke-dua adalah dengan mematikan monitor, terutama monitor yang jenisnya adalah jenis CRT (Cathode Ray Tubel), karena monitor jenis tersebut lebih banyak mengkonsumsi tenaga listrik. Jadi, jika anda ingin meninggalkan PC tersebut dalam waktu yang lama, sebaiknya matikan monitor anda.
Anda juga dapat menyetting Windows agar secara otomatis langsung mati dalam beberapa waktu tertentu, itu bisa dilakukan dengan cara, klik “Control Panel-Options”. Dalam “Power Options Properties” klik tab “Power Schemes”. Lalu klik tanda panah di bagian “Power Schemes” lalu pilih “Home/Office desk”. Lalu pilih waktu yang diinginkan pada “Turn Off Monitor” dan klik “Apply” dan “OK”.

3. Matikan Hard disk
Meskipun kita tidak sedang melakukan apa pun pada komputer kita, tapi data anda akan selalu dibaca dari hard disk (oleh sistem operasi dan beberapa aplikasi). Karena alasan ini, hard disk hard disk akan terus menerus berputar dan tentu saja ini akan menghabiskan energi. Jika anda ingin meninggalkan PC anda dalam waktu yang lama, maka sebaiknya matikan hard disk PC anda. Pada “Power Options Properties” lalu klik tab “Power Schmes”. Klik tanda panah di bagian “Power Schemes” dan pilih “Home/Off desk”. Kemudian klik “Turn off hard disk” dan pilih waktunya. Lalu klik “Apply” dan “Ok”.

4. Matikan peralatan lainnya
Matikanlah peralatan lainnya seperti, speaker, modem eksternal, scanner, Zip drive dan printer. Karena peralatan itu sangat menghabiskan banyak energi. Seringkali orang meninggalkan peralatan tersebut dalam keadaan aktif, bahkan saat kita sedang keluar dalam waktu yang lama.

5. Mode Hibernate
Mode hibernate ini adalah fasilitas untuk melakukan shut down, tapi tidak menutup atau mematikan aplikasi yang sedang kita buka tadi. Hal ini dapat dilakukan dengan cara Mode “Hibernate”. Dengan mode ini, isi memory utama (RAM) akan tersimpan dalam hard disk. Cara melakukan mode hibernate adalah sebagai berikut, pada “Power Options” kliklah tab “Hibernate”. Lalu klik kotak dekat “Enable Hibernation”. Klik juga pada tab “Advanced”. Dalam bagian “When I Press the power button” lalu klik tanda panahnya kemudian klik “Hibernate”. Klik “Apply” dan “Ok”. Setelah itu tekan tombol “Power” pada komputer anda. Mode hibernate sudah berfungsi, tekan tombol “Power” sekali lagi, komputer anda akan menyala dan akan otomatis membuka aplikasi yang telah anda buka tadi.

6. Mode Standby
Agar bisa menghemat energi, sebaiknya pengaturan monitor dan hard disk berada di bagian yang paling rendah pada mode standby. Jika anda ingin meninggalkan PC sebentar, sebaiknya aktifkan mode standby. Namun yang harus anda ketahui adalah, saat mode standby aktif data-data yang belum anda simpan dapat rusak atau hilang kalau PC anda mengalami kerusakan. Sebaiknya simpan dahulu data atau dokumen anda sebelum anda mengaktifkan mode standby ini. Mode standby dapat dilakukan dengan cara, klik “Start-Turn Off computer” lalu klik “Stanby”.

7. Gunakanlah UPS
Gunakanlah selalu alat UPS, karena alat ini bisa membantu penyelamatan data atau shut down saat terjadi mati listrik. Untuk mengatur peralatan UPS dan mengkonfigurasikan alat tersebut “Power Option Properties” lalu pilih tab UPS. Bagian status dalam tab UPS menampilkan perkiraan jumlah menit yang dapat didukung UPS terhadap PC anda. Sebenarnya banyak cara untuk mengkonfigurasikan UPS, namun hal ini tergantung dari model dan kapasitas UPS yang digunakan.

8. Baterai Laptop
Jika anda men-charge baterai laptop, pastikan proses charge-nya selesai. Karena proses charge yang dilakukan setengah-setengah lalu dilanjutkan kembali, itu malah akan menghabiskan banyak energi. Jika anda ingin berpergian, sebaiknya bawa selalu baterai tambaha. Untuk menghemat pemakaian baterai. Anda bisa memanfaatkan feature Hibernate/Suspended atau gunakan soket listrik yang dihubungkan ke stopkontak.

9. Port USB
Jika saat anda menggunaka laptop dan saat itu anda memasukkan salah satu ke port USB di laptop, sebaiknya kalau sudah selesai langsung dilepaskan saja. Karena peralatan yang masih tertancap di port USB, itu juga dapat menghabiskan tenaga pada PC atau laptop anda. Sebaiknya lepaskan alat tersebut bila pemakainnya dirasa sudah cukup.

10. Skema Pemakaian Energi Laptop
Biasanya produsen-produsen laptop juga menyertakan feature dan software power management. Software ini sangat berguna sekali bagi para konsumen laptop, karena software ini mampu mengatur pemakaian baterai dan daya listrik yang sedang digunakan. Di software ini ada beberapa pilihan yang dapat digunakan untuk mengetahui beban hard disk dan energi lain yang sedang digunakan oleh laptop. Di antaranya mengetahui kecepatan prosessor atau pencahayaan monitor yang tepat untuk dapat menghemat baterai. Software ini sekaligus dapat menjadi pengawas bagi kita dalam menggunakan laptop

macam macam power connector pada computer atau pc


1. 20/24 Pin Power Connector.

ini adalah connector yang menghubungkan antara PSU dengan motherboard. Connector ini bisa dilepas lagi pada bagian 4 connector terakhir untuk motherboard yang mengggunakn 20 pin. Jadi Connector ini mempunyai 2 kelebihan, bisa pada m otherboard yang membutuhkan 20 pin atau 24 pin. Sebenarnya Power connector ini lebih dominan dimiliki pada form factor ATX. Sedangkan untuk form factor AT yang merupakan PSU PC dahulu memiliki power connector berjumlah 12 pin. Tetapi sekarang sudah jarang PC yang menggunakan PSU jenis AT.


2. 4 Pin AUX Power Connector.images

Konektor 4 pin ini merupakan konektor power tambahan bagi processor dan motherboard. Dan jenis ini banyak ditemukan pada komputer-komputer yang baru atau yang procesornya diatas Pentium 4 yang versi baru.


3. MOLEX Power Connector.

Molex_female_connectorMOLEX merupakan konektor power yang bisa dibilang serba guna. Karena konektor ini konektor yang paling banyak digunakan. Seperti Harddisk, Optical Drive, kipas tambahan, dll


.


4. BERG Power Connector.psuguidefloppy

Konektor ini sekarang mulai ditinggal orang. Karena konektor ini merupakan power konektor bagi Floppy Drive. Sekarang Floppy Drive jarang digunakan karena data yang bisa ditampung sedikit. Konektor ini merupakan kembaran dari MOLEX.


5. SATA Device Power Connector.

sata15pinJika anda memiliki harddisk atau dvd-drive yang berjenis SATA , maka anda harus memiliki power konektor ini. Sebab, PSU belum menyediakan konnektor power SATA secara langsung. Konektor ini sebenarnya disambung dengan power konektor MOLEX.


6. 3 Pin Fan Power Connector.Untitled-2

Kipas processor pun punya konektor power tersendiri. Konektor tersebut berjumlah 3. Yang dihubungkan ke motherboard. Salah satu dari pin tersebut digunakan untuk mengetahui jumlah putaran kipas processor. Yang nantinya bisa diat ur pada BIOS.

Senin, 22 Februari 2010

Tips Memilih Flash Disk

Bagi kamu yang ingin membeli sebuah flash disk tentunya tidak ada salahnya mengetahui cara benar memilih flash disk. Berikut ini akan dijabarkan tips jitu dalam memilih flash disk yang tepat dan benar.

Dukungan software
Kamu dapat memilih flashdisk yang memiliki chip pengontrol di setiap unitnya. Chip pengontrol ini akan memudahkan kamu untuk meng-install USB flash disk dengan berbagai macam software portabel, seperti: Security Software, Partition Software, File Synchronization, dan lain-lain. Security Software sangat penting dalam memastikan data sensitive kamu tidak jatuh ke tangan orang tak berwenang. kamu dapat memilih flashdisk yang kompatible dengan beberapa system operasi, tanpa harus menggunakan driver atau tidak tergantung dengan driver tertentu.

Perhatikan kecepatan transfer data
Faktanya, kecepatan transfer data dari USB 2.0 berkisar antara 14 Mb/s hingga 24 Mb/s, namun kecepatan tersebut akan menurun jika menggunakan kabel USB atau USB hub. Walaupun USB 2.0 memiliki kecepatan lebih baik dari USB 1.1, dengan kecepatan 1.5 Mb/s.

Perhatikan desain dan kelengkapannya
Tidak hanya desain dan model fisik flashdisk yang sesuai dengan selera kamu, namun yang harus diperhatikan juga adalah kelengkapan produknya, seperti tali gantungan, tutup casing flashdisk, paket CD driver, fasilitas anti air, pengunci manual di luar casing, kabel USB, dan aksesoris lainnya.

Perhatikan kapasitas flashdisk
Kamudapat membeli flashdisk, tentunya yang sesuai kebutuhan dan tidak sampai kurang sehingga kamu harus membeli lagi, misalnya kapasitas ideal 2GB, dan sesuai dengan budget kamu.

Perhatikan garansi
Garansi sebisa mungkin life time, namun pemakaian rata-rata flashdisk pada umumnya hanya sekitar 2 hingga 3 tahun, bisa karena bosan memakainya atau mungkin kamu membutuhkan kapasitas yang lebih besar. Hal inilah yang menjadi dasar anggapan bagi sebagian orang bahwa masa garansi cukup hanya 2 hingga 3 tahun.

Perhatikan informasi manufaktur dan distributor
Pilihlah flashdisk yang handal dan memiliki service center yang jelas. Kamu harus memastikan kebenaran informasi mengenai produsen dan distributornya, dan cara menghubungi mereka. Hal ini berguna jika kamu misalnya mengalami masalah dengan flashdisk, atau klaim garansi, ketika outlet tempat kamu membeli flashdisk tidak bersedia melayani klaim kamu.

LANGKAH LANHKAH PEMBUATAN ANTENA WAJAN BOLIG

Membuat Antenna Wireless dari Wajan Bolic dengan Radio USB WiFi D-Link DWL-G120

UJI COBA MEMBUAT SENDIRI WIRELESS ANTENNA WAJAN BOLIC
DENGAN USB D-LINK DWL-G120

A.) Langkah awal adalah mempersiapkan bahan.
1 buah Wajan penggorengan diameter 36* cm
1 batang Pipa paralon diameter 1” panjang +/- 50* cm
2 buah Tutup pipa paralon paralon diameter 1”
1 buah Klem Antenna
1 buah Besi siku untuk rangka Klem Antenna
2 buah Baut + Sekrup diameter 1 cm
1 buah Kaleng Susu bekas + Tutup Plastik
1 buah USB Wireless D-Link DWL-G120 + USB Cable
1 buah UTP Cable CAT 5E panjang maximum 20 M

B.) Mempersiapkan peralatan tukang.

C.) Melakukan perhitungan berdasarkan teori sebagai berikut:
Untuk mencari jarak Fokus untuk Feeder

f = D^2 / (16*d)


Contoh hasil bisa di lihat di http://my.opera.com/m4m4n/albums/show.dml?id=158489

Semoga Bermanfaat

Membuat flashdisk menjadi bootable

Banyak sekali cara untuk menjadikan flashdisk anda menjadi bootable, hal ini saya tulis di blog ini karena pengalaman kemarin sewaktu saya berada di Semarang saat ada acara opening service center baru disana, dengan kondisi kantor baru tentu saja belum semua tools tersedia lengkap. Dan waktu itu harus mengupdate bios netbook sekitar 20 unit.

Netbook memang berbeda dengan notebook, biasanya netbook tidak dilengkapi dengan ODD (Optical Disk Drive), sehingga kalau untuk keperluan install software atau update bios kita memerlukan perangkat lain seperti eksternal ODD.

Sedangkan kemarin tidak tersedia eksternal ODD, yang ada cuma sebuah flashdisk. Jadi jalan satu-satunya adalah membuat flashdisk tersebut bootable serta mengcopy file biosnya ke dalam flashdisk.

Untuk membuat bootable flashdisk secara sederhana bisa dipakai cara sebagai berikut, utilitis yang saya pakai adalah dari HP, yang disebut dengan HP Windows Format Utility for USB Drive Key, bisa di download disini. Kemudian kita juga memerlukan Windows 98 files, bisa di download disini.

Kemudian extractlah kedua file tersebut dan install program HP windows format utility tadi, sambungkan USB flashdisk yang akan digunakan untuk bootable kekomputer dan jalankan program tersebut, tampilan programnya seperti dibawah ini.

hp-225x300

Di bagian DEVICE , pilih FlashDisk yang tadi sudah disambungkan ke PC.

Bagian File System , pilih FAT 32

Untuk Volume Label , silahkan isi dengan apa saja

nah di bagian Format Options , click options yang Create a DOS Startup Disk lalu pilih yang Using DOS system files located at : , click button … dan browse ke folder WIN98 hasil extract tadi.

Selesai dan flashdisk anda bisa digunakan untuk bootable disk.

Membuat Sidebar berada di Kiri dan Kanan

Beberapa waktu yang lampau saya telah memposting bagaimana cara membuat sidebar baru pada template minima sehingga template tersebut yang asalnya dua kolom berubah bentuk menjadi tiga kolom. Dari hasil pengamatan dilihat dari komentar-komentar yang muncul pada postingan tersebut ataupun ada juga yang melalui shoutbox, mengambarkan kegembiraan para sobat yang telah berhasil menyulap blognya menjaditiga kolom, selamat dech buat yang sudah sukses. Namun diantara yang telah puas, ada juga yang masih merasa penasaran dan juga berkeinginan lebih. Beberapa komentar yang muncul, di antaranya adalah sebagai berikut :


makasih bro...
aku dah berhasil tapi alangkah bagusnya jika post berada di antara side bar itu aku pengen yg kayak gitu gimana caranya bro?????

mas gimana klo mo naruh colom posting di tengah diantara sidebar kiri n kanan ???? tolong ya mas... thx

nambah kolom da bisa, tapi gimana cara nya meletakan side bar di kiri dan kanan sedangkan tempat posting nya berada di tengah-tengan side bar pada templete minima, tolong ya mas..


Rohman (anu kasep) : Hmmmmmmm... gimana ya... ada deeeech... rahasia pokoknya

Pembaca : dasar pelit

Rohman (anu kasep) : Bercanda dhenk

Pembaca : awas kalo ga di kasih tau


Untuk membuat kolom sidebar yang baru dibuat tidaklah terlalu sulit, sobat hanya perlu menempatkan kode float menjadi di kiri (left) serta penambahan kode padding-right agar kolom kiri tidak bertabrakan dengan kolom posting. Bingung? sengaja saya buat bingung

Bagi sobat yang berminat untuk menempatkan kolom sidebar di sebelah kiri, sebelum membaca artikel ini ada baiknya membaca artikel yang di sini terlebih dahulu karena artikel ini merupakan lanjutan dari artikel tersebut, jika sobat langsung membaca artikel ini, saya khawatir sobat menjadi tambah bingung.

Sebelum memasuki kepada topik bahasan utama, saya sarankan kepada sobat yang mempraktekan teori yang akan saya tulis sebaiknya bukan pada blog utama, akan tetapi pada blog untuk percobaan. Ini untuk menghindarkan kejadian yang tidak di inginkan, sayang apabila blog yang telah di tata rapih menjadi amburadul akibat percobaan.

Baiklah, ayo kita mulai sobat, dalam hal ini saya anggap sobat sudah berhasil membuat kolom baru. Langkah pertama yang harus di ingat adalah jangan sekali-kali memberi tanda conteng pada kotak kecil di samping tulisan Expand widget Template karena apabila sobat mencontengnya akan keluar kode widget yang sangat ngejelimet. Jika pada postingan yang lalu saya menuliskan kode seperti ini :


/* Outer-Wrapper
------------------------------------------ */
#outer-wrapper {
width: 840px
margin:0 auto;
padding:10px;
text-align:left;
font: $bodyfont;
}
#main-wrapper {
width: 410px;
float: left;
word-wrap: break-word; /* fix for long text breaking sidebar float in IE */
overflow: hidden; /* fix for long non-text content breaking IE sidebar float */
}
#sidebar-wrapper {
width: 220px;
float: right;
padding-left:10px; /* yg ini tambahan juga biar tampak ada jarak sela */
word-wrap: break-word; /* fix for long text breaking sidebar float in IE */
overflow: hidden; /* fix for long non-text content breaking IE sidebar float */

#sidebarbaru-wrapper {
width: 180px;
float: right;
padding-left:10px;
word-wrap: break-word;
overflow: hidden;
}


Agar hasilnya berbeda dengan yang dulu yaitu kolom yang di buat bukan berada pada sebelah kanan, maka sobat perlu sedikit mengubah kode yang saya cetak merah menjadi seperti ini :


#sidebarbaru-wrapper {
width: 180px;
float: left;
padding-right:10px;

word-wrap: break-word;
overflow: hidden;
}


Terlihat pada hurup yang saya cetak biru bahwa yang di ubah hanyalah dua baris kode saja, yang lainnya tidak perlu di ubah. Jika sudah selesai mengubahnya, jangan lupa untuk menutupnya dengan menekan tombol simpan template.

Langkah selanjutnya adalah menuju ke bagian bawah template, yaitu pada bagian body, jika dulu saya menyarankan agar kode sidebaru di tempatkan seperti ini :


Maka apabila sidebar baru ingin di tempatkan di sebelah kiri, maka kode sidebar baru harus di pindahkan di atas kode main (posting) sehingga kodenya kira-kira akan menjadi seperti ini :


Apabila sudah selesai menempatkan kode sidebar baru, silahkan akhiri dengan menekan tombol Simpan Template, selesai. Silahkan lihat hasilnya !

Tidak sulitkan sobat? semoga mudah untuk di mengerti. Untuk melihat contoh blog yang mempunyai sidebar di samping kiri dan kanan, sobat bisa membuktikannya di sini!

Membuat Banner Animasi

Agar blog kita tampil dinamis dan lebih atraktif, salah satu caranya adalah dengan memajang banner animasi.karena dengan banner animasi, mata dari pengunjung akan langsung tertuju kepada banner tersebut, terutama apabila anda seorang pebisnis, banner animasi akan lebih efektif untuk iklan yang kita pasang di banding dengan banner biasa. Cara membuat banner animasi sangatlah mudah, mau yang gratisan ada, mau yang bayar juga ada.Tapi tentunya ada kelebihan dan kekurangannya.

bagi anda yang berminat dengan banner animasi gratis, anda bisa kunjungi http://www.addesigner.com Silahkan daftar (gratis), Jika sudah di terima anda tinggal memilih banner yang di sediakan, trus ya tinggal di masukin ke blog, mau di sidebar atau di dalam postingan tentu bisa. Untuk cara pemasangan silahkan anda baca postingan terdahulu bagaimana cara memasukan kode HTML kedalam blog.

Contoh banner animasi :


selamat mencoba.

Sabtu, 20 Februari 2010

Auto Pagination on Blogger

Latency is a word you hear a lot at Google. We are always looking for ways to make our products faster, because we have consistently found that faster page loads mean more satisfied users. This post is the first of an occasional series that will discuss ways in which we’re working to make blogs load faster for all users.

A few months ago, we took a look at ways to improve the performance of Blogger blogs, and noticed that many pages — particularly search results pages, label pages and archive pages — were taking longer to load than they should.

This has lots of implications. Users suffer — pages take longer to load, and for anyone around the world who pays for their bandwidth, they can incur unneccessary charges as their browser downloads more content than needed. You suffer, because as latency increases, pageviews go down. (See here for a study Google did last year for this phenomenon at google.com.)

Starting today, we’re rolling out a change that affects how we paginate webpages on Blogger. We will dynamically adjust how much content to send to the browser depending on (a) the amount of HTML on the page being requested (in kilobytes) and (b) the number of images on the page. Users can continue to use “older posts” and “newer posts” navigation elements to see additional posts.

For major changes like this, we do incremental roll-outs so we can monitor performance as they progress. We expect the change to be fully deployed over the next week, and once fully deployed, we expect to see several results:
  • pages will load faster
  • pageviews, if impacted at all, may increase
We will keep an eye on things, and if we see anything unexpected, we will update this post. Otherwise, keep blogging - and we’ll keep working to make your blog faster for you and your readers!

February 10, 2010

A quick note about music blog removals

Earlier today, word spread about some popular music blogs that were recently removed from Blogger. While we make it a policy to not publicly discuss individual users or their accounts, we wanted to clarify a few things about how and when Blogger enforces its Terms of Service as they relate to our DMCA policy.

Last summer, we updated our enforcement of the DMCA. Our current policy is that when we receive a DMCA complaint, we:
  • Notify the blogger about the complaint by e-mail and on the Blogger dashboard.
  • Reset the offending post to 'draft' status, allowing the blogger to remove the offending content.
  • Send a copy of the complaint to ChillingEffects.org.
When we receive multiple DMCA complaints about the same blog, and have no indication that the offending content is being used in an authorized manner, we will remove the blog.

Inevitably, we occasionally receive DMCA complaints even though the blogger does have the legal right to link to the music in question. Whether this is the result of miscommunication by staff at the record label, or confusion over which MP3s are "official," it happens. If this happens to you, it is imperative that you file a DMCA counter-claim so we know you have the right to the music in question. Otherwise, if we receive multiple DMCA complaints for your blog, this could very well constitute repeat offenses, compelling us to take action.

Update: Should have linked directly to the instructions for filing a counter-notification.

Update 2/11/10: We looked into this issue further and identified one case where a blogger did not receive notification of any DMCA complaints before their blog was removed. We're sorry about this.

We've contacted the blog owner and restored their blog, effective immediately, and we fixed the bug that caused the termination without prior notification. We're also looking into additional preventative protections. We know the DMCA process can be difficult to navigate, and we're working on ways to make this process as smooth as possible.

February 03, 2010

Create Pages in Blogger

By Sean McCullough, Software Engineer

Another top user-requested feature has just graduated from Blogger In Draft! Blogger now makes it easy to create Pages linked from your blog.
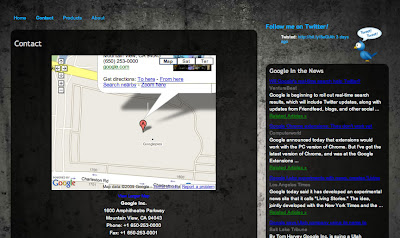
This feature lets you easily publish static information on stand-alone pages. For example, you can create an About This Blog page that discusses the evolution of your blog, or a Contact Me page that provides directions, a phone number, and a map to your location.

You create a page similar to how you write a blog post. From Blogger click the Posting | Edit Pages tab, then click New Page. (Note: you can create up to 10 pages.)


Once your page is published, you can link to it from the new Pages widget. The Pages widget lets you add links to your pages as tabs at the top of your blog, or as links in your blog's sidebar.


In the Pages widget, you can decide which pages will be linked and in what order they will appear. You can also choose whether you want new pages to appear automatically in the Pages widget by checking or unchecking the box to the left of Add new Pages by default.

Finally, for those of you that have custom templates, your custom template may not automatically support Pages as horizontal "tabs". If you are familiar with HTML, follow these instructions on how to add Pages to your custom template.

Looking forward to seeing all of the Pages that bloggers create!

How the Google Page Creator shutdown may affect your blog

By Wiktor Gworek, Software Engineer (Krakow, Poland)

A while back, Google announced that they were shutting down Google Page Creator and offered users the option to upgrade to Google Sites. In the past, some custom template designers used Page Creator to host javascript, a file type that Google Sites does not support. Since a number of bloggers use templates that rely on files hosted on Page Creator, we realized that links to those files would break once the migration from Page Creator to Sites was complete.

Fret not! Rather than see our users' templates break, we built a tool to preserve these links and host the affected files. To find out if your blog is affected, login to your Blogger Dashboard. If we've detected that your blog template contains links to Google Page Creator, you will see the following warning:


If you see this warning, click Update and review to access the Blogger Template Fixer and correct the links on your blog. (Note: you may not notice any problems with your blog until Page Creator shuts down over the coming days). Visit our Help Center to learn more about fixing your template.

Also, if you have issues fixing your template, let us know at the Blogger Help Group.

January 22, 2010

Important Note to FTP Users

Last May, we discussed a number of challenges facing Blogger users who relied on FTP to publish their blogs. FTP remains a significant drain on our ability to improve Blogger: only .5% of active blogs are published via FTP — yet the percentage of our engineering resources devoted to supporting FTP vastly exceeds that. On top of this, critical infrastructure that our FTP support relies on at Google will soon become unavailable, which would require that we completely rewrite the code that handles our FTP processing.

Three years ago we launched Custom Domains to give users the simplicity of Blogger, the scalability of Google hosting, and the flexibility of hosting your blog at your own URL. Last year's post discussed the advantages of custom domains over FTP and addressed a number of reasons users have continued to use FTP publishing. (If you're interested in reading more about Custom Domains, our Help Center has a good overview of how to use them on your blog.) In evaluating the investment needed to continue supporting FTP, we have decided that we could not justify diverting further engineering resources away from building new features for all users.

For that reason, we are announcing today that we will no longer support FTP publishing in Blogger after March 26, 2010. We realize that this will not necessarily be welcome news for some users, and we are committed to making the transition as seamless as possible. To that end:
  • We are building a migration tool that will walk users through a migration from their current URL to a Blogger-managed URL (either a Custom Domain or a Blogspot URL) that will be available to all users the week of February 22. This tool will handle redirecting traffic from the old URL to the new URL, and will handle the vast majority of situations.
  • We will be providing a dedicated blog and help documentation to provide as much information as possible to help guide users through the migration off of FTP.
  • Blogger team members will also be available to answer questions on the forum, comments on the blog, and in a few scheduled conference calls once the tool is released.
We have a number of big releases planned in 2010. While we recognize that this decision will frustrate some users, we look forward to showing you the many great things on the way. Thanks for using Blogger.

January 13, 2010

Support Haiti Disaster Relief

Like many of you, we watched in horror as news emerged from Haiti about yesterday's disastrous earthquake. For those of you who publish your blog with Blogger, we built a couple of widgets that make it easy to invite your readers to contribute money to the Red Cross's international disaster relief effort. Pick a size that best fits your sidebar:

" type="hidden">" type="hidden">
After clicking the appropriate button, select which of your blogs you want to add the widget to, then click "Add widget". The Red Cross assures us that 100% of the money raised is going to disaster relief efforts in Haiti — we and they thank you for your support!

Not on Blogger? Be sure to
visit the Red Cross's Haiti banners page with banners that you can add manually, or visit Google's page containing information about relief organizations, news and contact info relating to the earthquake.

December 16, 2009

Blogger integrates with Amazon Associates

Earlier this year we simplified the process for monetizing your blog by adding a “Monetize” tab in the Blogger app. We started with AdSense, which allows you to add contextual advertising to your pages; more recently we added AdSense for Feeds to help you generate revenue from the distribution of your blog via RSS and Atom. Today we launched a third option: direct integration with Amazon Associates to search Amazon’s product catalog and add links to products that earn you commissions when your readers buy products you recommend.

With this feature, you can search Amazon directly from the Blogger editor and add pictures and links to Amazon products right into your posts. Your readers will earn you commissions whenever they buy the products you recommend, and if you don’t already have an Amazon Associates account, you can sign up for one for free without leaving Blogger.

If you’ve ever written a blog post about a book, recommended a gadget, or reviewed a toy you bought for your kids, you’ve likely gone through the process of drafting the post, opening up a separate window to go to find a site that sells the product, then going back to Blogger to paste the link to the product into the post editor.

Starting today, you can search the Amazon product catalog without leaving the Blogger interface and insert links to the products you find into your posts. Not only is the process of linking to products more efficient, but Amazon makes it easy for you to earn money whenever your readers actually buy the products you write about. This is known as an “affiliate program”, and it’s designed to let you recommend products you like to your audience — if they buy the product, you’ll earn a commission on that purchase. (For more on affiliate programs in general, here is a good overview at ProBlogger from this summer, and Darren’s “11 Lessons Learned” post about Amazon Associates is a good review of how to get the most out of the program.)

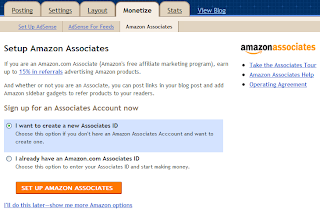
To get started, click on the Monetize tab for your blog and click “Amazon Associates”. Walk through the setup wizard, and add the Product Finder once you’re done.


Now for the fun part: when you are writing a post on Blogger, you’ll see an Amazon gadget to the right of your post editor (the “Product Finder”). You can search the Amazon product catalog from within Blogger — type in the name of the product you are writing about, and insert a link to the product, an image of the product, or an iframe containing the image, price details and a “buy it now” button. Every link that’s created contains your unique Associates ID, ensuring that Amazon will credit you for any purchases that result from readers clicking the link on your blog.


If you’re an existing Amazon Associate, completing this setup simply makes the Product Finder available on Blogger for you — you continue to earn the same referral rate from Amazon. New Associates receive the same referral rate from Amazon that they would have received if they signed up directly. If you’re not interested in earning a referral, you can still install the Product Finder: from the “Amazon Associates” page under the Monetize tab, click “I'll do this later — show me more Amazon options” and then click “Add the Product Finder” button.

A quick note about trust: affiliate programs work well when readers trust you. You should avoid promoting products simply because of the referral fee you might earn — readers may lose some of that trust if they sense your posts exist solely to make you money. You may also want to disclose to your readers that you will earn a commission on their purchase — some readers even prefer knowing that you benefit from their business.

There’s more information about this integration at Amazon.com, and the Amazon Associates blog has some more details. This integration is the result of months of collaboration between the engineers at both companies, and we’re very excited to share the results of this collaboration with you. Happy blogging!

December 09, 2009

One-click Blogging with BlogThis! Chrome Extension

by Chang Kim, Product Manager, Blogger

More and more of you are using Google Chrome (more than 30 million active users now!), and we want to let you know that a Blogger extension is included in the Chrome Extensions gallery. The BlogThis! Chrome extension is available now, one of several hundred extensions to be found in the Chrome extensions gallery.

Using the BlogThis! Chrome extension, you can start writing a blog post in one click. Whenever you are inspired by a web page you are looking at and want to blog about it, just click on the BlogThis! button on your Chrome toolbar, and the Blogger post editor opens up with a pre-populated link to the web page you were on. If you want to include any text in your post, simply highlight it before clicking on the BlogThis! button. Edit the post as you'd like, and publish it instantly or save it as a draft for future posting.


To try out the BlogThis! Chrome extension, first switch to Google Chrome BETA (if you are not already on that version), and install the BlogThis! extension by clicking on "Extensions" on your browser toolbar or visiting the BlogThis! extension homepage. Note: Extensions are only available for Chrome on the PC and Linux; Extension support on Chrome for Mac is under development.

November 10, 2009

Coming up Next...

by Helen Kang, Software Engineer, Blogger


Some of you must have wondered what the Next Blog link on the NavBar does, and clicked on the link once or twice. Next Blog used to take you to a random blog, written by a random blogger. Your fellow blogger could have been writing her blog in a language that you don't know how to read. Or you might be someone who likes to read about food and restaurants in Germany, but your randomly chosen next blog could have been focused on sports, and written in Tagalog.

We've made the Next Blog link more useful, by taking you to a blog that you might like. The new and improved Next Blog link will now take you to a blog with similar content, in a language that you understand. If you are reading a Spanish blog about food, the Next Blog link will likely take you to another blog about food. In Spanish!

You might discover a cool blogger who has hobbies similar to yours, has similar taste in electronic gadgets, likes sports that you're into, or has similar curiosities and interests. We will finish rolling out the new and improved Next Blog link over the next week and hope that you will enjoy discovering blogs that are likely to interest you.

This has been a fun, collaborative effort on the Blogger team and we've enjoyed the support we received from other Google teams. We really hope you enjoy the new, more relevant Next Blog as much as we do.

November 06, 2009

Blogger in Your Own Words


Last week we asked you for a few words to describe both the Blogger of the present and the Blogger you'd like to see in the future. You responded overwhelmingly, and now as promised we'd like to share the unedited results with you:

Blogger Today
(click for large version)


Blogger in the Future
(click for large version)


Thanks to everyone who pitched in their two cents; we're very excited to take your words and start writing the next chapter of Blogger.